Short answer
Yes, an ASUS Chromebox 3 can be turned into a full Ubuntu server, and it takes about 40 minutes. The sequence: enable Developer Mode with the recovery pinhole, flash RW_LEGACY with SeaBIOS using the MrChromebox script (no case opening, the stock firmware stays intact), install Ubuntu Server 24.04 from a USB stick, grow the LVM volume and set a static address.
But 40 minutes is the clean path: an empty drive and a stick that really holds Ubuntu. With a second-hand drive that still carries someone else's OS, or if Developer Mode gets switched off, budget half a day. Both traps are covered below, in Three keys that break everything and If Developer Mode gets switched off.
A used unit costs roughly 35 US dollars and draws 10–15 watts. The storage slot takes M.2 2242 SATA only, and memory is DDR4 SO-DIMM up to 16 GB.
In this article
- Why bother
- What is inside and what to check before buying
- The key decision: RW_LEGACY, not Full ROM
- Preparation
- Step 1. Developer Mode
- Step 2. Flashing SeaBIOS
- Step 3. Installing Ubuntu
- Step 4. After the install
- Upgrading the disk and memory
- Power: will it come back after an outage
- When you do need full UEFI firmware
- Three keys that break everything
- If Developer Mode gets switched off
- Gotchas: symptom, cause, fix
- Frequently asked questions
Why bother
Infrastructure needs small machines that simply keep running: external monitoring that watches the hypervisor from the outside, a watchdog that sends alerts, DNS, a backup target, a VPN node. A full server is overkill for those roles, and a cloud instance is a monthly invoice for something that belongs in your own rack.
Retired Chromeboxes fill that niche better than anything else on the market. We bought an ASUS Chromebox 3 for about 35 US dollars. Inside: an Intel Core i3-7100U, two DDR4 memory slots and an M.2 slot. Power draw under load is 10–15 watts, less than a light bulb.
| Option | One-off cost | Per month |
|---|---|---|
| Used Chromebox 3 plus your own RAM and disk | ~$35 | ~$1 electricity |
| New mini PC, 32 GB / 1 TB | $700–850 | ~$1 |
| Cheapest cloud server for the same role | $0 | $30–40 |
The box pays for itself in the first month. The one condition is that you already own the memory and the disk, because those are the expensive parts right now: DRAM contract prices nearly doubled over the past year.
A Chromebox is not a development or database machine. Two cores, four threads. It is a workhorse for background services that must always be up and never noticed.
What is inside and what to check before buying
| Component | Details |
|---|---|
| CPU | i3-7100U — 2 cores / 4 threads, Kaby Lake, 15 W |
| Memory | 2 × SO-DIMM DDR4, usually 2×2 GB stock, 16 GB ceiling |
| Storage | M.2 2242 SATA — not NVMe. NVMe simply does not work in this slot |
| Firmware chip | Winbond W25Q128, 16 MB |
| Network | Gigabit Ethernet plus Intel AC 7265 Wi-Fi |
SKUs differ by suffix: G001U is a Celeron and best avoided; G002U is the i3-7100U; G003U is an i5-7200U; G004U is an i7-8550U with four cores and eight threads, the pick of the range. If the seller has a Chromebox 4 (CN67), take it instead: it has a normal M.2 2280 NVMe slot rather than the hard-to-find 2242 SATA.
A two-minute check before you pay:
- Open
chrome://management— it must say the device is not managed. - Open
chrome://system, findcpuinfoand confirm the CPU model.
The key decision: RW_LEGACY, not Full ROM
There are two firmware paths for Chromebooks and Chromeboxes. Picking the right one is half the job.
| Full ROM (UEFI) | RW_LEGACY + SeaBIOS | |
|---|---|---|
| Open the case | Yes — to disable hardware write protection | No |
| Stock firmware | Overwritten | Left intact |
| Risk of bricking | Real | Practically none |
| Boot experience | Standard UEFI | SeaBIOS — dated, but it works |
We deliberately chose the second path. On Linux the script writes only the RW_LEGACY region; the factory firmware sits behind hardware write protection and is physically unreachable. Even in the worst case the box can go back to ChromeOS.
That is enough for a box in your own rack. If it will live at a client site with no administrator nearby, see When you do need full UEFI firmware.
Preparation
| What you need | Details |
|---|---|
| USB stick | 8 GB or larger. A "4 GB" stick really holds 3824 MiB: Ubuntu 24.04.5 (3891 MiB) does not fit, 24.04.4 (3247 MiB) does. A ChromeOS recovery image (4.5 GB) needs 8 GB. And check what is actually on the stick before you blame the box |
| Image | Ubuntu Server 24.04 LTS (live-server, amd64) |
| Paperclip | for the recovery pinhole |
| Keyboard | plain wired USB, straight into a rear port, no hubs |
| Monitor | HDMI or DisplayPort |
| Network | cable only. Wi-Fi on these boxes gives 200 ms latency on the LAN |
The official Ubuntu mirror sometimes throttles to 800 KB/s, which turns the download into an hour. A mirror that held full speed for us:
curl -LO https://ftp.lysator.liu.se/ubuntu-releases/24.04/ubuntu-24.04.5-live-server-amd64.isoWriting the stick on macOS:
diskutil list external physical      # find the disk, double-check the size
diskutil unmountDisk /dev/diskN
sudo dd if=ubuntu-24.04.5-live-server-amd64.iso of=/dev/rdiskN bs=4m
diskutil eject /dev/diskN
Write to rdiskN, not diskN — it is several times faster. macOS has no status=progress; press Ctrl+T for progress instead. After writing, diskutil list should show several partitions rather than a single FAT one.
Step 1. Developer Mode (~15 minutes)
First, find the recovery button. On a Chromebox it is a pinhole, and it is not on the port panel — look on the opposite side of the case. The right hole takes the paperclip 5–8 mm deep and clicks. If it goes deeper, that is not it.
- With the box off, insert the paperclip and hold it.
- Press Power. The recovery screen appears — release the paperclip.
- Press Ctrl + D and confirm.
- The box reboots and asks for recovery again — repeat with the paperclip, then Ctrl + D once more.
- The switch to Developer Mode takes 10–15 minutes and several reboots. Leave it alone.
If Ctrl + D does nothing, that is a known CN65 quirk with USB keyboards. Cut the power completely (hold Power for 10 seconds), plug the keyboard straight into a rear port, power on and press the keys only after the screen appears. It works on a cold boot.
Step 2. Flashing SeaBIOS (~5 minutes)
Once in Developer Mode, press Ctrl + Alt + F2 for a text console. Log in as root with an empty password.
sudodoes not work in the ChromeOS shell (Ctrl+Alt+T) — you need this second console./mntis read-only there, so write files to/tmpor/mnt/stateful_partition.
Optional but worthwhile — dump the factory firmware first:
flashrom -p internal -r /mnt/stateful_partition/stock.rom
sha256sum /mnt/stateful_partition/stock.rom
The file must be exactly 16,777,216 bytes. The programmer is called internal, not host; with the wrong name the command simply fails.
Now the firmware itself:
curl -sSL -o /mnt/stateful_partition/firmware-util.sh \
  https://raw.githubusercontent.com/MrChromebox/scripts/main/firmware-util.sh
bash /mnt/stateful_partition/firmware-util.shY and the box simply reboots into ChromeOS with nothing flashed — that cost us one round on our second unit.In the menu pick 1 → L (Legacy BIOS / SeaBIOS) → Y → N.
That final N answers "default to booting from USB?". Say no, so the box always boots from its internal disk — otherwise a USB stick left in a port will hijack the boot at the worst possible moment. USB is still available from the SeaBIOS menu with Esc.
Then enable alternative firmware booting:
crossystem dev_boot_altfw=1 dev_boot_usb=1 dev_default_boot=altfw
crossystem dev_boot_altfw dev_boot_usb dev_default_boot   # expect: 1 1 altfw
The older names dev_boot_legacy and legacy are deprecated — they still work but print warnings.
Step 3. Installing Ubuntu (~15 minutes)
Put the stick in a rear port and reboot. On the developer screen you can press Ctrl + L to skip the 30-second wait. As soon as Press ESC for boot menu appears, press Esc and pick the number next to your USB stick.
Booting from Hard Disk... — the drive still holds ChromeOS, which SeaBIOS cannot boot. Nothing is broken: reboot and catch the Esc window. It is short, so press a few times, but only once the SeaBIOS banner is on screen.| Installer step | Choice |
|---|---|
| Type of install | Ubuntu Server (not minimized) |
| Network | DHCP picks the address up automatically |
| Storage | Use an entire disk → the internal drive |
| Profile | server and user name as you like |
| SSH Setup | enable the OpenSSH server |
| Snaps | select nothing |
At the end the installer offers to reboot and then asks you to remove the installation medium and press Enter — in that order. Pull the stick earlier and the screen fills with SQUASHFS error messages: that is the live environment dying after its disk disappeared. The installation itself is already complete, so hold Power for 10 seconds and switch the box back on.
Step 4. After the install
Claim the rest of your disk
The Ubuntu installer with LVM allocates only half the disk to the root filesystem. The rest sits unused, and most people notice months later:
sudo lvextend -l +100%FREE /dev/ubuntu-vg/ubuntu-lv
sudo resize2fs /dev/ubuntu-vg/ubuntu-lv
df -h /
Static address
Create /etc/netplan/99-static.yaml:
network:
  version: 2
  ethernets:
    enp1s0:
      dhcp4: false
      addresses: [192.168.1.11/24]
      routes:
        - to: default
          via: 192.168.1.1
      nameservers:
        addresses: [192.168.1.1, 1.1.1.1]
sudo chmod 600 /etc/netplan/99-static.yaml
echo 'network: {config: disabled}' | sudo tee /etc/cloud/cloud.cfg.d/99-disable-network-config.cfg
sudo netplan applyBasic tooling and a reboot test
sudo apt install -y etherwake wakeonlan htop tmux jq net-tools ethtool lm-sensorsReboot and confirm the address sticks. A normal boot takes about 40 seconds.
Upgrading the disk and memory
The good news first: you do not need to reflash anything. RW_LEGACY lives in the flash chip on the mainboard, not on the disk, and the crossystem settings live in NVRAM. Swap the drive and the box still boots into SeaBIOS, waiting for an operating system.
| What survives | What you redo |
|---|---|
| RW_LEGACY and SeaBIOS | Install Ubuntu on the new disk |
| Developer Mode | Restore your service configuration |
crossystem settings and boot order | Re-join the node to your VPN |
Back up the configuration before you open anything. On a small service box this is a handful of files:
sudo tar czf ~/box-config.tgz \
  /etc/netplan /usr/local/bin /etc/systemd/system/*.service \
  /etc/systemd/system/*.timer /home/$USER/.ssh
scp ~/box-config.tgz you@your-workstation:~/wipefs -a /dev/sdX), or open the SeaBIOS boot menu with Esc and pick the stick by hand.What not to buy blindly:
- Storage: M.2 2242, SATA only. NVMe of any length will not be detected, and a 2280 module will not fit.
- Memory: DDR4 SO-DIMM, non-ECC. Two slots, a practical ceiling of 16 GB. DDR3L looks similar but will not work.
- Two identical modules run in dual channel — noticeably faster for the same money than one larger stick.
Buying a used SSD, check smartctl -a /dev/sda before installing it. What matters is not the power-on hours but the wear level: a drive that spent four years in an office machine writing almost nothing will show about 2% of its endurance used, which makes it effectively new.
Power: will it come back after an outage
For infrastructure this question matters more than CPU speed. A machine that needs someone to press its button after every power cut is not an infrastructure node.
We tested it: our Chromebox powers on by itself as soon as mains power returns. After a blackout the node comes back with no human involved — which, in Ukraine, is the whole point. We pulled a second unit straight from the wall socket on purpose: it reached a working Ubuntu in about 45 seconds — 30 of them on the developer screen, 13 for the OS itself. Not a single key press needed.
ethtool reports Wake-on: d). Once it is shut down from the command line, only the physical button brings it back. If you plan to power it down remotely, verify this first.For comparison, a used business micro PC such as an HP ProDesk has both Wake-on-LAN and "power on after AC loss" in its BIOS, and both work. It costs a little more but offers a normal UEFI, a 2.5-inch drive bay and no firmware work at all. If the prices are close, take the business micro PC. The Chromebox wins purely on price.
When you do need full UEFI firmware
RW_LEGACY is ideal for a box in your own rack. But it leaves the Chromebox in Developer Mode, and with it every trap: the "OS verification is OFF" screen on each boot, the space bar that wipes the disk, Esc with Power that starts ChromeOS recovery. Next to an administrator these are details. At a client site, a retail point or anywhere you cannot reach quickly, they are a risk.
That is where the MrChromebox Full ROM firmware belongs: the stock ChromeOS firmware is replaced with coreboot and UEFI, and the box becomes an ordinary mini PC.
| RW_LEGACY | Full ROM (UEFI) | |
|---|---|---|
| Developer screen and 30-second wait | every boot | none |
Space or Esc+Power can break everything | yes | no |
| Boot mode | BIOS (SeaBIOS) | UEFI — disk encryption and TPM become possible |
| Open the case | no | yes — remove the write-protect screw |
| Going back to ChromeOS | any time | only from a backup of the stock firmware |
| Powers on by itself after a power cut | yes (tested) | yes (tested) |
| From reboot to network access | ~45 s | ~33 s |
For the script to rewrite the stock firmware, hardware write protection has to come off. On the ASUS Chromebox 3 that is a screw. Remove the bottom cover to reach the memory and SSD bay. The write-protect screw sits in the bottom-left corner of the board, next to the memory slots, with a copper contact ring around it:
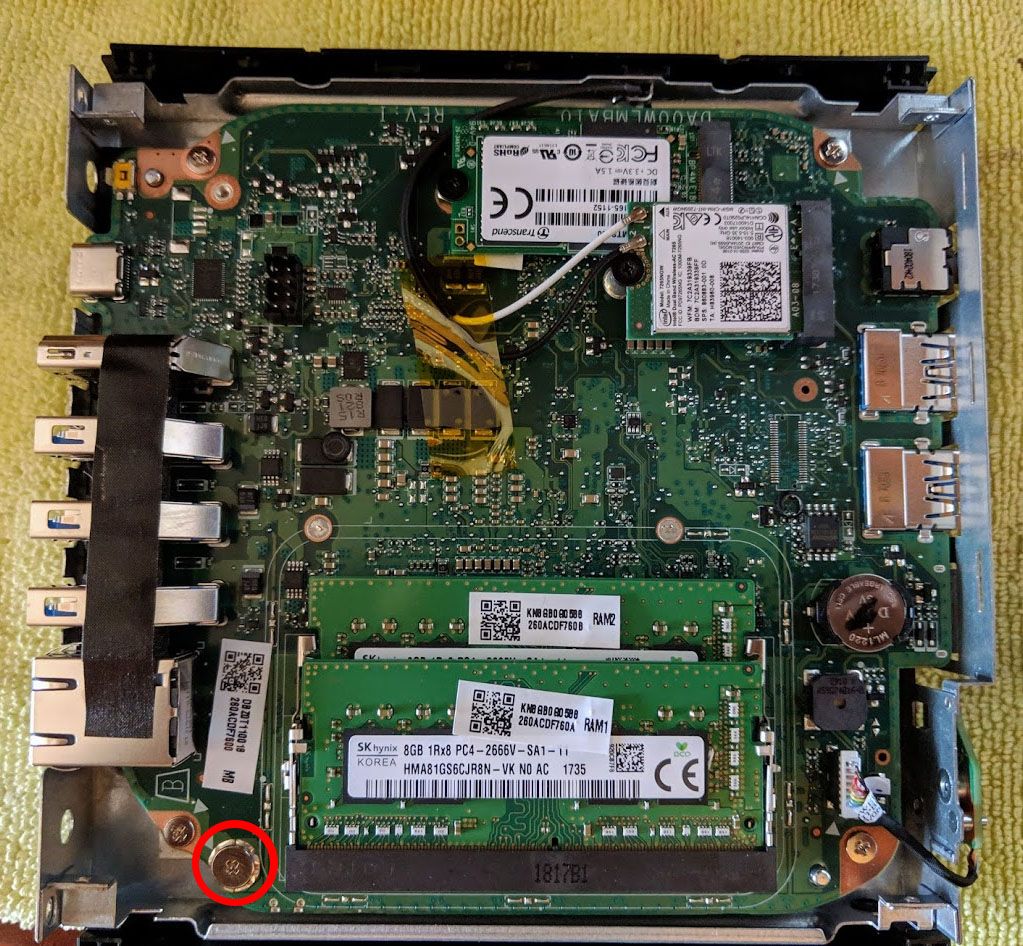
We have now walked this path on a second Chromebox 3. Here is what it actually looked like:
- Unplug the power, remove the bottom cover, take out the screw and leave it out. Close the cover.
- Enable Developer Mode and open the console as in steps 1–2 above, then run
firmware-util.sh. - Confirm protection is really off. The menu header reads
Fw WP: Disabled, and thePR0/GPR0 WPline and the PR0 warning disappear. The[WP]tag next to options 2–4 stays, but turns green — with the screw in place it is red. If it still saysEnabled, stop. - Try to back up the stock firmware to a separate FAT32 USB stick with
5) Backup Current Firmware. Without it you cannot return to ChromeOS, and if the write is interrupted only an external programmer can revive the box. - Choose
2) Install/Update UEFI (Full ROM) Firmware. The script asks three times:yat "Do you wish to continue?", then typeI ACCEPTin capitals, thenYafter the warning that ChromeOS will no longer boot. Answernto the backup offer if you already have one. - The script does the rest: downloads the firmware, carries over the serial number and the network card's MAC address (the line
VPD extracted from current firmware) and writes it. It took us about a minute. Wait forFull ROM firmware successfully installed/updatedand do not power anything off before it. - Reboot. The first boot after flashing can take thirty seconds or more with a black screen — that is normal. Pick the installer stick with
Escat the boot logo. - Reinstall Ubuntu, this time in UEFI mode: a system installed through SeaBIOS sits in BIOS mode and will not boot on the new firmware. The installer creates the GPT layout with an EFI partition by itself.
The result. No developer screen, no beeps. We pulled the box from the wall socket and it powered on by itself and reached Ubuntu, just as it did with RW_LEGACY. The OS boots in 12–13 seconds, and from a reboot command to SSH access takes about 33 seconds versus ~45 with RW_LEGACY. The network card kept its factory MAC address.
enp1s0; with full firmware it becomes eno0, because coreboot describes the onboard NIC differently. The installer handles this on its own, but if you set a static address using the example from step 4, write eno0 in netplan — otherwise the box ends up with no network.Three keys that break everything
The expensive mistakes here cost hours, not money. All three are about when you press a key.
| Key | When | What happens |
|---|---|---|
| Space | on the "OS verification is OFF" screen | Switches Developer Mode off. The worst outcome: the box stops booting SeaBIOS, and the only way back is a full ChromeOS recovery — roughly an extra hour |
Esc | together with the power button | At that moment keys are read by the ChromeOS firmware, where Esc means "enter recovery mode". SeaBIOS never gets a look in |
Ctrl+D | on the developer screen | Safe: it just skips the 30-second wait and boots the internal drive |
SeaBIOS appears on screen. Only then press Esc. Note that the monitor re-syncs after the developer screen and goes dark for a second, so the SeaBIOS line is easy to miss.If Developer Mode gets switched off
How to spot it: the box keeps showing the recovery screen asking for recovery media. Press Tab for debug info. The tell-tale signs are recovery_reason: 0x5b ("No bootable kernel found on disk") together with dev_boot_legacy: 0 and dev_default_boot: 0.
It is fully recoverable, and the firmware itself is untouched:
- Find the recovery image for your model. Google publishes the list at
dl.google.com/dl/edgedl/chromeos/recovery/recovery2.json. Match the code shown on your screen: for the ASUS Chromebox 3 it is^TEEMO .*. You need a stick of 8 GB or more — the unpacked image is about 4.5 GB. - Do not be fooled by the checksum. The
sha1field in that file is the hash of the zip archive, not of the unpacked image. We nearly condemned a perfectly good image over this. - Install ChromeOS from that stick, straight from the recovery screen. It wipes the drive.
- Re-enable Developer Mode: recovery pinhole plus Power, then
Ctrl+Dand confirm. Keep the pinhole pressed for a few seconds after power-on — the firmware does not sample it instantly. - Restore the boot flags in the console (
Ctrl+Alt+F2, log in asroot):crossystem dev_boot_altfw=1 dev_boot_usb=1 dev_default_boot=altfw - Reflash RW_LEGACY — in the same console, before you install Ubuntu: run MrChromebox
firmware-util.sh, then1,L,YandNat "Default to booting from USB?". Wait for "RW_LEGACY firmware successfully installed/updated".
Gotchas: symptom, cause, fix
The first box cost us several days. This table is why the next ones take forty minutes.
| Symptom | Cause | Fix |
|---|---|---|
| Two beeps, no boot | Firmware download interrupted mid-flash | Re-run option 1 in the script and wait for the success line |
Ctrl + D does nothing | USB keyboard not initialised | Full power cycle, keyboard into a rear port, press after the screen appears |
| Script hangs two minutes, downloads an empty file | URL without https:// | Always give the scheme explicitly |
| Installer does not fit on the stick | A "4 GB" stick is 4009 MB, the image is 4080 MB | Use 8 GB or larger |
Screen full of SQUASHFS error | USB stick pulled before the installer asked | Harmless: the install finished, power cycle the box |
| Disk appears half the size | LVM gave root only half the volume group | lvextend and resize2fs |
| Old network settings return after reboot | cloud-init rewrote netplan | Disable cloud-init network management |
| You insert the Ubuntu stick and Windows or an old system starts | The internal drive still carries another OS, and SeaBIOS tries the drive first | Wipe the drive beforehand, or pick the stick from the Esc menu |
| The "Ubuntu" stick boots nothing at all | It actually holds a different image. A volume label of ESD-USB plus install.esd means it is a Windows installer | Check the contents before blaming the hardware |
| The box keeps asking for recovery media and will not leave that screen | Developer Mode was switched off | See the section above |
| Boots with the stick, reboot loop without it, no SeaBIOS banner | RW_LEGACY prefers USB. Typical after a ChromeOS recovery | Reflash RW_LEGACY: 1, L, Y, N |
| A USB stick hijacks the boot | Firmware set to boot USB by default | Reflash RW_LEGACY answering "no" to that question |
| The firmware script rebooted straight into ChromeOS, the menu never appeared | Answered Y to the PR0/GPR0 warning | Run the script again and press only Enter at that prompt |
After flashing, the screen freezes at Booting from Hard Disk... | SeaBIOS goes to the internal drive, which still holds ChromeOS | Reboot, press Esc at the SeaBIOS banner and pick the stick |
The boot order can be changed later from Ubuntu, with nothing disassembled:
cd /tmp && curl -sSL -O https://raw.githubusercontent.com/MrChromebox/scripts/main/firmware-util.sh
printf '1\nL\nY\nN\n\nQ\n' | sudo bash firmware-util.sh
This is safe: on Linux the script writes only the RW_LEGACY region, verifies the checksum and refuses to flash a corrupted file.
Frequently asked questions
Can you install Linux on a Chromebox without opening the case?
Yes. Choose RW_LEGACY with SeaBIOS rather than Full ROM. RW_LEGACY is written to a flash region that is not hardware write-protected, so the write-protect screw stays where it is. The stock ChromeOS firmware remains intact and the device can be reverted.
Which SSD fits an ASUS Chromebox 3?
Only M.2 2242 with a SATA interface. NVMe drives are not detected in this slot at all, and 2280 modules do not fit physically. The Chromebox 4 (CN67) uses a regular M.2 2280 NVMe slot.
How much RAM does the Chromebox 3 support?
Two DDR4 SO-DIMM slots with a practical ceiling of 16 GB. DDR3L modules look similar but will not work, and ECC memory is not supported.
Does the Chromebox power on by itself after a power cut?
Yes — we verified it on two units running RW_LEGACY: pulled from the wall socket, the box reaches Ubuntu on its own in about 45 seconds. Wake-on-LAN is disabled, though, so after a command-line shutdown only the physical button brings it back.
When does a Chromebox need full UEFI firmware instead of RW_LEGACY?
When the box lives where no administrator is around: a client site, a retail point. RW_LEGACY keeps the developer-mode screen, where the space bar wipes the disk and Esc with Power starts ChromeOS recovery. MrChromebox Full ROM removes that screen and gives a normal UEFI, but you have to open the case and remove the write-protect screw — on the ASUS Chromebox 3 it is in the bottom-left corner of the board next to the memory slots. We tested it: with full firmware the box still powers itself on after a power cut and reaches the network in about 33 seconds. More in the full firmware section.
How much power does this server draw?
10–15 watts, roughly 8–11 kWh per month, about one US dollar on 2026 tariffs. That is less than an hour of an equivalent cloud instance.
The Chromebox beeps twice and will not boot after flashing. What now?
Two beeps mean a corrupted RW_LEGACY region from an interrupted download. Re-run the MrChromebox script, pick option 1 and wait for the success line. The factory firmware is untouched, so the device is not bricked.
Chromebox or mini PC for a home server?
The Chromebox wins on price — about 35 dollars used against several hundred for a new mini PC. A used business micro PC wins on convenience: normal UEFI, working Wake-on-LAN, a 2.5-inch bay, no firmware work. If you already own DDR4 memory and an M.2 2242 SATA drive, the Chromebox is the better deal.
Can you run local AI models on a Chromebox?
No. Two cores, four threads and no discrete GPU make local large language models impractical. Use it for monitoring, alerting, DNS, backups and VPN nodes instead.
Summary
Thirty-five dollars, forty minutes and your own memory and disk buy a silent server that draws less than a light bulb and restarts itself after a power cut. For external monitoring, an infrastructure watchdog, DNS or a backup target, that is more than enough.
The things worth remembering: check that the device is not enterprise-enrolled, take the RW_LEGACY path rather than Full ROM, wait for the success line while flashing, and remember that the only drive that fits is M.2 2242 SATA.
Need infrastructure that does not depend on the cloud?
We build private servers, monitoring and backup systems for businesses — from a single watchdog box to a full virtualisation cluster.
Discuss a project